For years, Backtrack Linux, a penetration testing suite from Offensive Security has been the standard operating system for security testing professionals. However, Offensive Security has just released a new distribution based on Backtrack called Kali Linux which seems to offer quite a few improvements. In a previous post, I showed how to create a Backtrack virtual machine using the open-source virtualization software VirtualBox. I felt it would be helpful to create a similar post showing how to create a Kali Linux virtual machine. The process will be nearly identical, but hopefully will still serve as a useful reference to some. With that being said, let's get started.
Creating the Virtual Machine
After getting both Kali Linux installation media, as well as downloading and installing VirtualBox, the first thing we will want to do is to open up VirtualBox and create a "New" VM (disregard the existing VMs on my system).

Then, we will name the operating system. In this case, I will simply name it "kali". After selecting that we are intending to install Debian on the machine (since we know that Kali is using Debian), we will click "Next."

After naming the VM, we need to select the amount of memory (RAM) that we will allocate to it. Since all these virtual machines are running on my laptop, I just start out with 512 MB and move up as needed. Then we will click "Next".

Next, we need to create the virtual hard drive for the VM. I usually just select the default option to "Create a virtual hard drive now" to help keep the VM's separate. We then click "Create."

Once we have selected the type of hard drive we want, we should select the type of hard drive format we want for our virtual machine. As explained in the previous post, each of these has their purposes, but since I stick to VirtualBox, I just create the hard drive as a VDI. Then, we'll click "Next".

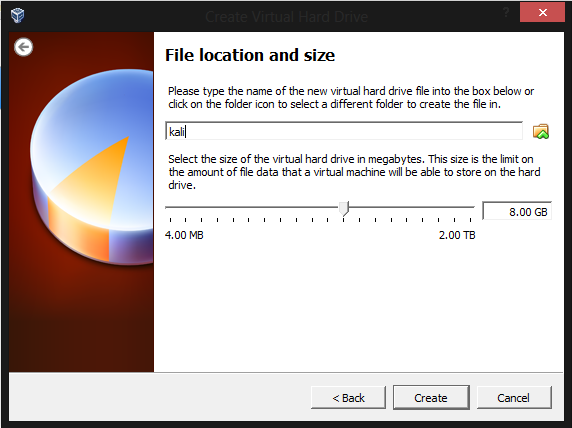
To save space where possible, I select to "Dynamically allocate" space on the hard drive as needed. Then, click "Next".

Finally, we need to select how much space we want to allocate to the VM. This will largely depend on personal preference, but I usually start with the default 8GB and allocate more as needed. Then, we click "Create" to create our VM.

After we land in the boot screen, we want to install the OS to the VM so that we won't need access to the ISO every time we want to use it. So, we will select "Install."

Next, we select our language, country, and keymap as appropriate. Then, we will set a hostname for our system. In this example, I just used "kali."

Then, if you have a specific domain name to configure you can do so. Otherwise, just hit "Continue". Next, we need to set a root password. Choose whatever you like, but I will use the Kali default "toor".

After confirming this password, and selecting our time zone, we need to partition our virtual hard drive to install the OS. Since we created a separate VDI for this VM, we can select to use the entire disk.

After confirming the disk to partition (the only disk available), and selecting how we want to partition the filesystem (for my example I only created one partition, but feel free to change as you would like), the installer will begin writing the changes to the disk and installing the OS.
Once everything is installed, there is one more step to do before we can boot into the system. We need to enable PAE/NX for the VM. Otherwise, you may get a fatal error when attempting to boot into Kali Linux. To do this, highlight the VM in the homescreen, and click "Settings". From here, navigate to the "System" submenu and go to the "Processor" tab. You will see the option to "Enable PAE/NX". Check this box to enable it.

After doing this, we can boot into our system. If everything goes well, we should be presented with the following login screen:

From here, just login as "root" using the password set earlier and you're good to go! Enjoy using Kali Linux, and a big thanks goes out to the guys and gals from Offensive Security who work hard to make the best distro possible.
While this was a very basic post, as always, comment below with any questions or comments!
-Jordan
how starting GUI in KALI
ReplyDeleteroot@kali:~#startx
-bash: startx: command not found
help!
Hey there! Thanks for the comment. I think that Kali Linux boots into the Gnome GUI by default... is this not the case for you?
DeleteOtherwise, you could try "/etc/init.d/gdm3 start"
For me, that says no such file or directory. I installed it lilo from a usb mini iso to a partition on my HDD.
Deletethanx bud ..
ReplyDeleteIt was really helpful
For some reason when I run Nmap, it only can find my host... I have the network adapter set to bridged in the virtualbox settings.. is there a way i can run this and see all the other devices on my network except only my host computer?
ReplyDeleteSome day, in a brazilian forum I did read the following sentence: "It's not possible to see a device else by using virtual machine". I don't know why, but it really seems true.
DeleteThis comment has been removed by the author.
ReplyDeleteА как сделать общий буфер в Kali & Virtualbox?
ReplyDeleteThis comment has been removed by a blog administrator.
ReplyDeleteHey
ReplyDeleteHelp me please i dont have the iso file in my files.
And when i press setup it says cannot find "win32loader.ini"
Please Help
Anyone Plz Help
DeleteHi there!
DeleteI'm afraid I don't understand your problem.. Do you have virtualbox installed? If not, there is a previous post for doing that. If you do have it installed, then it should be a matter of downloading the latest Kali Linux ISO and following the instructions.
What step is causing this problem?
I have The virtual Box program but i dont have the iso image file in my kali linux files.
DeleteNice post, unfortantly its still not working for me. At bootup i get 2 warnings and so the "OH NO! There is a problem contact system admin" Screen appears instead of the login window.
ReplyDeletethe warnings are:
1. Not starting: protmapper is nor working....
2. Root filesystem has insufficient free space, mounting tmpfs on /tmp...
Any idea why this would happen. I configured Virtualbox like you discriped. I checked several times and tried to install it on 2 diffrent computers. Both run Win7 x64 as Hostsystem.
Any Help would be much appriciated
THX
So know I tried it with VMware Player and it works :)
DeleteGreetz
This would not work with 8GB disk space, had to go at least 12GB and 20GB seemed to be a good number. Otherwise i got the dreaded "Oh No! Something has gone wrong" error
ReplyDeleteInteresting - thanks for the heads up! This may have been an update which now requires more space. I'll try it out and update the blog accordingly.
DeleteThanks again.
thanks this works
DeleteNice article! Very helpful. :)
ReplyDeletehttp://techwikasta.com/2013/05/how-to-install-kali-linux-os-on-virtual-box/ Try this too. You may find it simpler. :)
Dear Jordan;
ReplyDeleteafter i install the kali in the VM (virtual Box) then boot i got an error saying
"A Problem has occurred and the system can't recover. please contact a system administrator"
while the same KALI iso is used to build a usb boot device and it is working.
is this from the KALI installation or the VM sittings knowing i fallow every details you described.
you have to reinstall it, and choose "graphical install" instead of just "install"
ReplyDeleteIk heb een Cobra en een geest Undine 2 radar detector en stoorzender. De Cobra is een beetje van Undine, maar het is beter om ongeveer $ 150 voor de Cobra. Er is ook een $ 89 Cobra 360-graden laser bescherming die waarschijnlijk beter is dan de Undine hetzelfde niveau. Natuurlijk kunt u altijd een fuzz buster! Hen herinneren? Zij waren de eerste radar detector! Ze zijn digitale display modellen die indrukwekkend uitzien, maar zijn moeilijk te vinden. Ik zou Whistler vermijden. Ik heb geen ervaring met Fox Vixen detectoren die worden verkocht sommige plaatsen. Ik zou krijgen om te gaan met de Cobra, gevolgd door de moeilijk te fuzz buster (om deze reden), dan Ondine en Whistler vinden. Ze zijn allemaal onder $ 200.
ReplyDeleteWeb Link - www.schreudersolutions.eu/nl/radar-detector
This comment has been removed by the author.
ReplyDeleteHI
ReplyDeleteAfter I install Kali linux to virtual box I get an error message saying
'A fatal error has occurred while running the machine and the machine execution has been stopped"
I have done the regular install and the graphical installs and re installed both ways
and still get the same message If anyone can help that would be great
Thanks
I gat to the boot menu but when I hit install it just sits there. the boot menu disappears but the kali logo sits there? anyone I really need help
ReplyDeleteTo everybody who gets an ERROR when booting into Kali: Right-Click on your Virtual Machine in the VirtualBox Manager, select "Settings". In the next window, choose "System", go to "Processor" and check the "Enable PAE/NX"-Box. Now it should work :-)
ReplyDeleteThanks your article helped me solve the fatal error problem!
ReplyDeleteI got as far as partitioning the disk and when I clicked guided-use whole disk, it said there was apparently not enough space. I gave it more than the amount you chose for MB and GB. I have the virtual hard drive in my external hardrive. Would that be an issue? Please help I have no clue
ReplyDeleteinstallation to unclean target error.
ReplyDeleteThis comment has been removed by the author.
ReplyDeleteplease help when i boot the installation media it tell me this: couldn't get to the storage media(VERR NOT SUPPORTED)" help me
ReplyDelete